📖 Descrizione
Lo ZX Levitator è una docking-base modulare studiata per rendere i computer ZX Spectrum (e i loro cloni moderni) facilmente portatili. Integra una base con batteria Li-Po, casse stereo e un display ribaltabile: il computer si aggancia tramite staffe intercambiabili specifiche per ogni modello. Il design punta a mantenere l'aspetto e l'esperienza originale lasciando però il dispositivo libero di essere usato senza fili.
🔧 Primo setup
L'unità viene fornita con le staffe appropriate per il modello scelto (es. The Spectrum) già montate. Verificare che tutte le viti siano salde prima dell'uso.

💻 Installazione del computer
- Svitare le staffe anteriori.
- Inserire il computer nella sede prevista.
- Riavvitare le staffe anteriori per fissare il dispositivo.
Nota: le staffe anteriori sono leggermente elastiche – per alcuni modelli è possibile allargarle leggermente per inserire il computer senza svitare. Tuttavia questo stressa la plastica: per usi ripetuti è sempre consigliabile svitare e riavvitare per preservarne l'integrità.
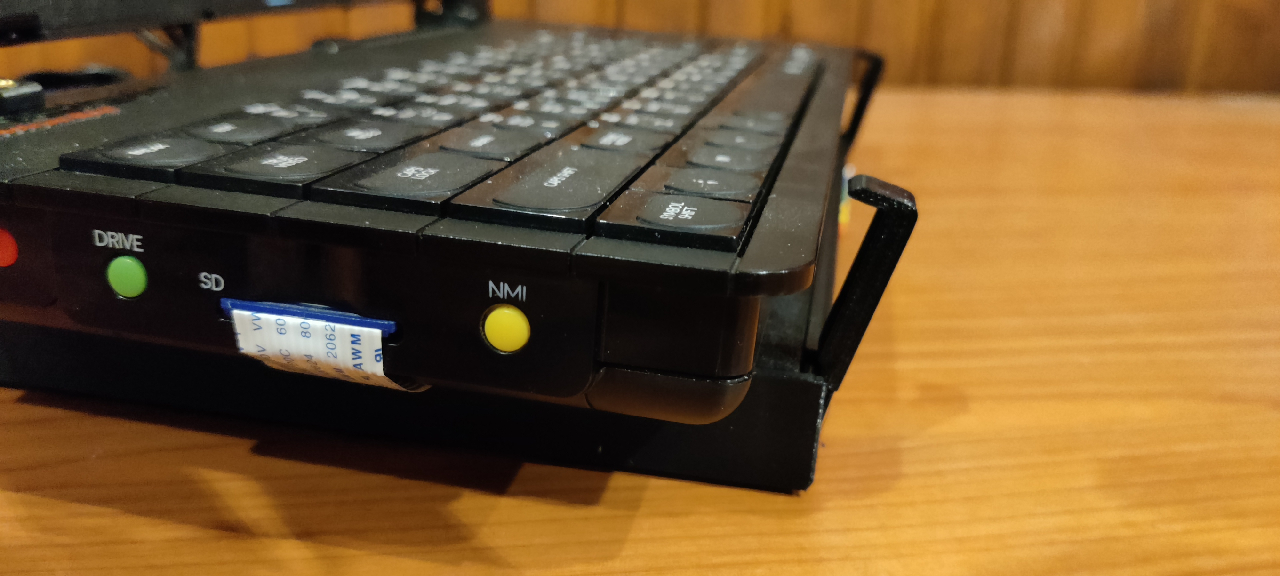
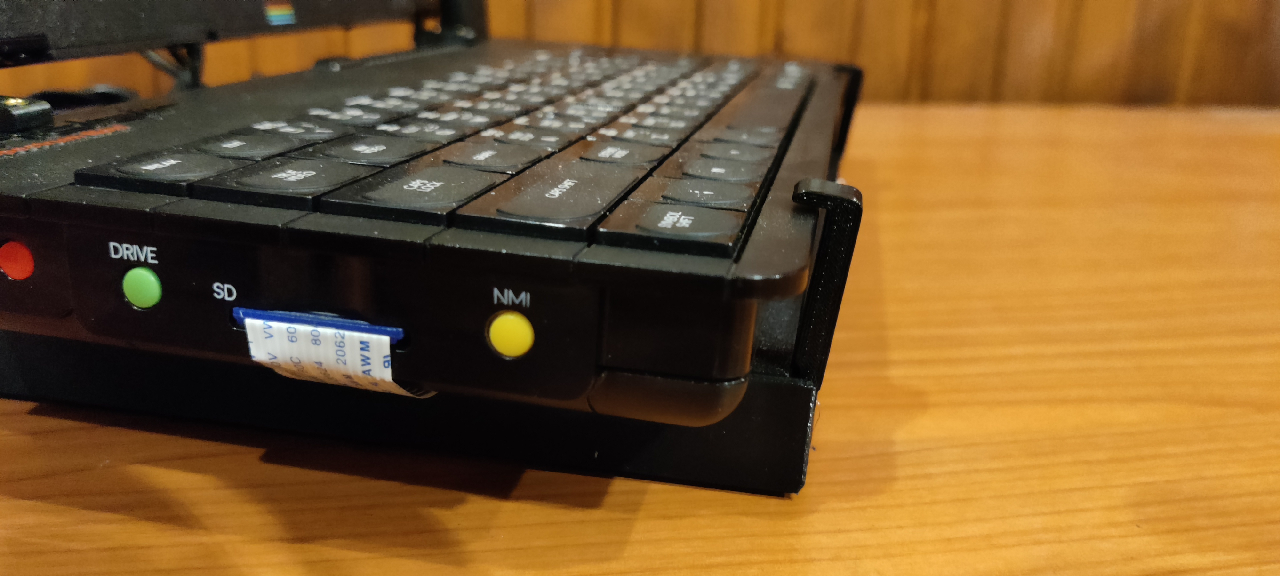
🆕 Nuovo Sistema di Staffe a Sgancio Rapido
✨ Novità: Montaggio e Smontaggio Facilitato!
Le nuove staffe anteriori basculanti rendono il cambio di computer molto più rapido e semplice.
🔄 Staffe Anteriori Basculanti
Le nuove staffe anteriori a sgancio rapido incorporano un meccanismo basculante che permette di montare e smontare il computer senza svitare nulla.
Come funzionano:
- Apertura: Tira semplicemente la staffa verso l'esterno
- Chiusura: Spingi la staffa verso l'interno fino allo scatto
- Inclinazione: Le staffe si inclinano di 15 gradi per facilitare l'inserimento
- Nessuna vite: Il meccanismo basculante mantiene il computer perfettamente fermo
💡 Vantaggi:
- Montaggio del computer in 5 secondi
- Nessuno strumento necessario
- Meccanismo sicuro e affidabile
🔌 Collegamento cavi
Una volta inserito il computer, collegare i cavi forniti. Tipo e quantità dipendono dal modello installato:
Esempio: The Spectrum
- Collegare il cavo HDMI (corto) dall'uscita HDMI del The Spectrum all'ingresso HDMI del Levitator.
- Collegare il cavo USB-C (corto) dall'uscita USB del Levitator all'ingresso USB-C del The Spectrum.
- Accendere lo ZX Levitator utilizzando il pulsante sul retro (sotto l'uscita 9V).
- Accendere The Spectrum con il pulsante POWER sul retro sinistro.
- Selezionare l'ingresso video HDMI tramite telecomando o pulsanti frontali del Levitator.
- Nota: se il display viene spento o si seleziona un ingresso diverso, The Spectrum potrebbe spegnersi; riaccenderlo con il tasto POWER se necessario.
Esempio: ZX Spectrum 48K
- Collegare il cavo video composito (RCA giallo) all'uscita video composita dello Spectrum (se presente o installata).
- Collegare l'uscita MIC dello Spectrum agli ingressi audio RCA del Levitator (L/R).
- Collegare il cavo di alimentazione con inversione di polarità (plug 5.5 x 2.1 femmina→maschio) dall'uscita 9V del Levitator all'ingresso 9V dello Spectrum (lo Spectrum ha il polo negativo centrale).
- Accendere lo ZX Levitator con il pulsante sul retro (sotto l'uscita 9V).
- Selezionare l'ingresso video AV tramite telecomando o pulsanti frontali del Levitator.
⚠️ IMPORTANTE: Cavi di Alimentazione
⚡ Attenzione alla Polarità!
Ogni computer DEVE utilizzare il cavo di alimentazione a lui dedicato per evitare gravi danni sia al computer che allo ZX Levitator.
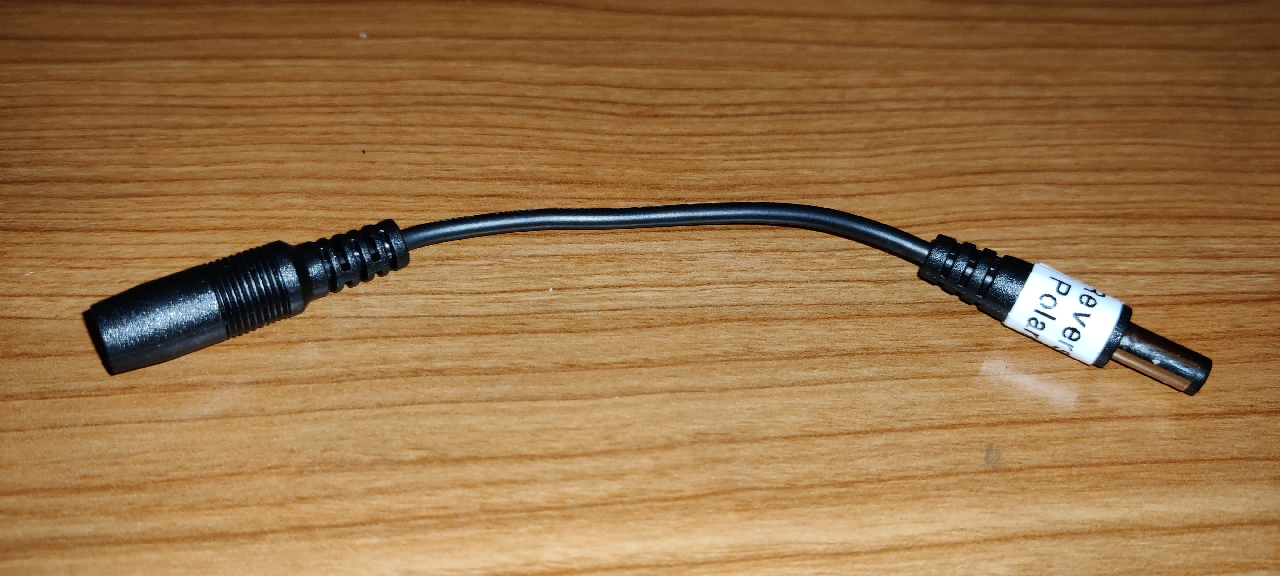
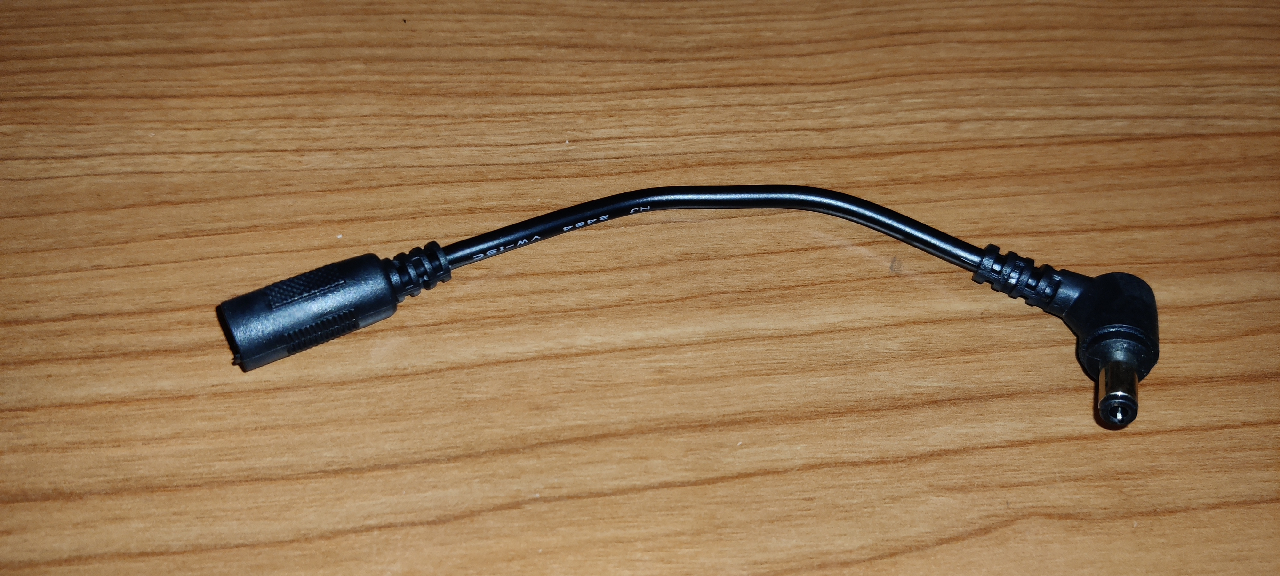
🔌 Cavi ZX Spectrum 48K/128K vs ZX Spectrum Next
I cavi di alimentazione per lo ZX Spectrum 48K/128K e per lo ZX Spectrum Next si assomigliano molto, dato che utilizzano entrambi un plug da 5.5 x 2.1 mm, ma hanno polarità opposte:
ZX Spectrum 48K/128K
- Polarità INVERTITA
- ⚫ Negativo centrale
- 🔴 Positivo esterno
- 🔌 Spinotto dritto
- 📝 Scritta sul cavo: "Reversed polarity"
ZX Spectrum Next
- Polarità STANDARD
- 🔴 Positivo centrale
- ⚫ Negativo esterno
- 🔌 Spinotto angolare (90°)
💡 Come riconoscerli facilmente:
- Cerca la scritta "Reversed polarity" sul cavo (48K/128K)
- Controlla lo spinotto: dritto = 48K/128K, angolare = Next
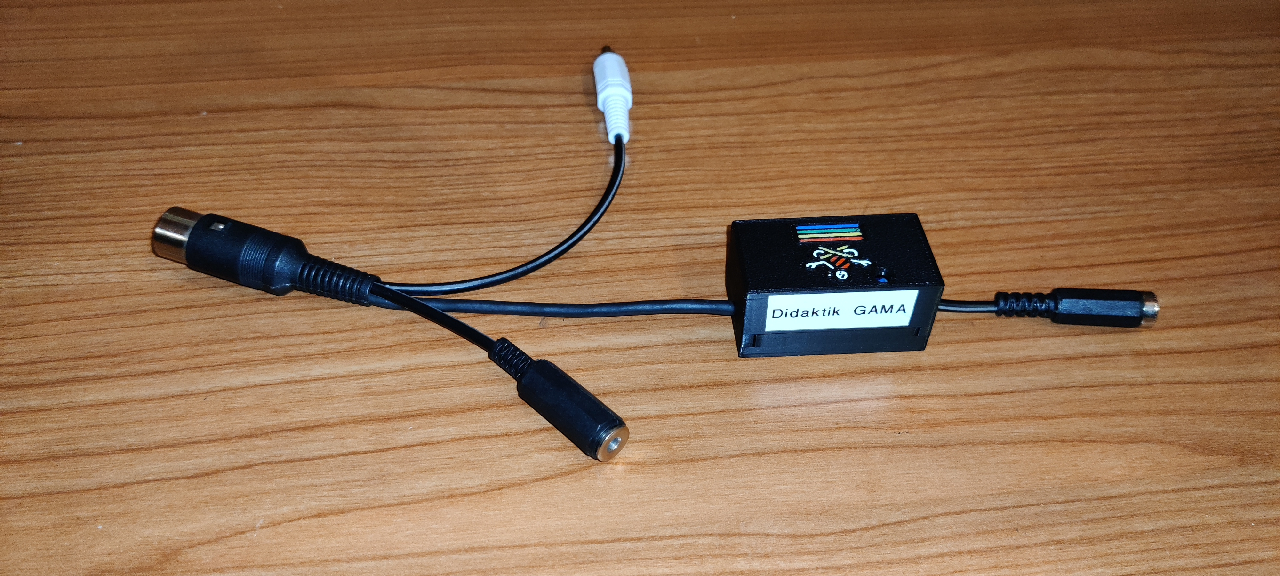
🔧 Cavi Speciali per Altri Computer
Alcuni computer richiedono cavi di alimentazione personalizzati con configurazioni specifiche.
Ad esempio, i Didaktik Gama e Didaktik M necessitano di cavi con una power box integrata lungo il cavo che sdoppia l'alimentazione nelle tensioni richieste:
- Didaktik Gama: power box che genera 5V e 12V dai 9V del Levitator
- Didaktik M: power box che genera 5V e 20V dai 9V del Levitator
Questi cavi hanno connettori completamente diversi e non sono compatibili né confondibili con quelli degli ZX Spectrum.

⚠️ Regola d'Oro
Usa SEMPRE e SOLO il cavo fornito specificamente per il tuo modello di computer. In caso di dubbio, NON collegare l'alimentazione e contatta il supporto.
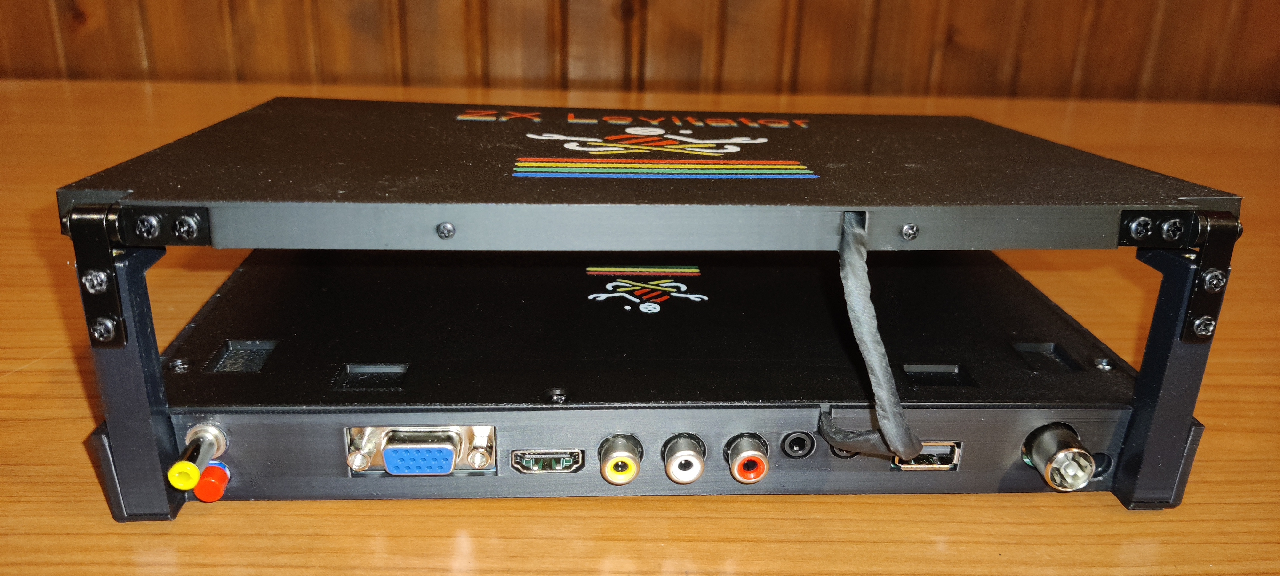
🎮 Porte posteriori
(vista da dietro, sinistra→destra)
- Uscita 9V DC (sopra) / Pulsante accensione (sotto)
- Ingresso VGA
- Ingresso HDMI
- Ingresso Video composito — giallo
- Ingresso audio RCA Left — bianco
- Ingresso audio RCA Right — rosso
- Ingresso audio stereo per VGA
- Uscita cuffie
- Porta USB 5V (power / media)
- Ingresso RF
- Ingresso alimentazione 13V DC 3A
Nota: verifica che il cavo di alimentazione corrisponda alla polarità e tensione indicate prima di collegare.
🎛️ Pulsanti frontali
(vista frontale, sinistra→destra)
- Accensione / Spegnimento display — rosso
- Cursore giù — giallo
- Cursore su — giallo
- Cursore sinistra — verde
- Cursore destra — verde
- Menu display — blu
- Sorgente video — bianco

💡 LED del Pannello Frontale
Lo ZX Levitator dispone di tre LED sul pannello frontale che forniscono informazioni immediate sullo stato del dispositivo. Da sinistra a destra:
LED Stato Carica Batteria
Posizionato a sinistra, accanto al battery monitor, indica lo stato di carica della batteria:
- 🔴 Rosso fisso: Batteria in carica
- 🔵 Blu fisso: Batteria completamente caricata
- 🔴🔵 Lampeggiante rosso e blu: Batteria assente o difettosa
- ⚫ Spento: Alimentatore non collegato
Ricevitore del Telecomando
Il ricevitore a infrarossi del telecomando è integrato nel pannello frontale dello ZX Levitator e si trova dietro un piccolo foro, non immediatamente visibile. Evita di coprire o ostruire quest’area per garantire una corretta ricezione dei comandi dal telecomando, specialmente quando si utilizza il dispositivo da una distanza superiore a 2 metri.
LED Stato Schermo
Indica lo stato di accensione dello schermo del display. Lo stato cambia premendo il pulsante di accensione/spegnimento sul telecomando o sul pannello frontale:
- 🔴 Rosso fisso: ZX Levitator alimentato ma schermo spento
- 🔵 Blu fisso: Schermo acceso
🔋 Battery Monitor
Lo ZX Levitator è dotato di un battery monitor digitale posizionato sulla sinistra del pannello frontale, che permette di monitorare in tempo reale lo stato di carica delle batterie.
Utilizzo del battery monitor:
- Accensione/Spegnimento: Premere brevemente il pulsante del battery monitor per accendere o spegnere il display. Il voltmetro mostrerà la tensione attuale delle batterie in tempo reale.
- Allarme batteria scarica: Quando la carica scende al 10% o meno, l'indicatore rosso inizia a lampeggiare per avvisare che è necessario ricaricare le batterie.
- Spegnimento automatico: Il display si spegne automaticamente dopo alcuni secondi di inattività per risparmiare energia (il tempo è configurabile).
Ingresso accidentale nel menu di configurazione: Se si tiene premuto accidentalmente il pulsante del battery monitor per più di 2 secondi, sul display comparirà una scritta come "L03", "F03", "P12" o "B-0", indicando che si è entrati nella modalità di configurazione. Per uscire da questa modalità e tornare alla visualizzazione normale della tensione, seguire questi passaggi:
- Tenere premuto il pulsante per 2 secondi - il numero visualizzato (ad esempio "03" in "L03") inizierà a lampeggiare
- Tenere premuto nuovamente il pulsante per altri 2 secondi - questo conferma il valore e il numero smetterà di lampeggiare, tornando fisso
- Tenere premuto ancora una volta il pulsante per 2 secondi - il battery monitor uscirà dal menu di configurazione e tornerà alla visualizzazione normale del voltaggio
Se dopo essere entrati accidentalmente nel menu di configurazione avete premuto il pulsante più volte e non sapete in quale pagina vi trovate, non preoccupatevi: seguite comunque i tre passaggi sopra descritti (pressione lunga → pressione lunga → pressione lunga) e tornerete alla visualizzazione normale. Il valore eventualmente modificato verrà salvato ma non influenzerà il normale funzionamento dello ZX Levitator.
A questo punto, per essere sicuri che il Battery Monitor sia configurato correttamente (deve essere su L03), vi basterà premere a lungo 4 volte il pulsante (pressione lunga → pressione lunga → pressione lunga → pressione lunga).
Per maggiori informazioni sulla configurazione completa del battery monitor, consultare la pagina dedicata alla configurazione.
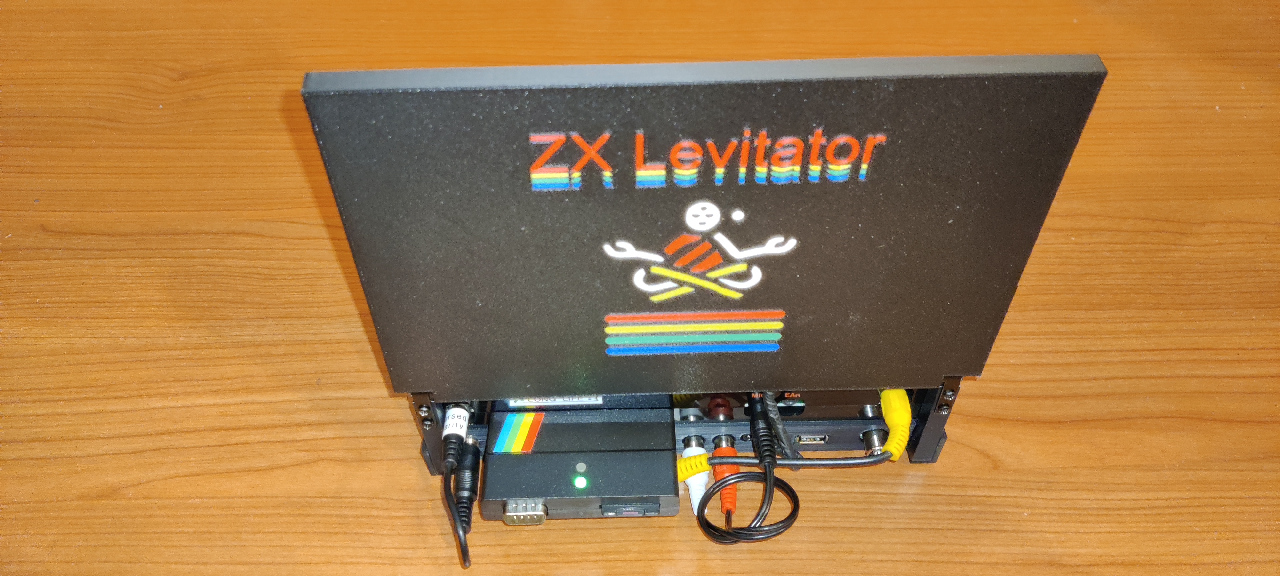
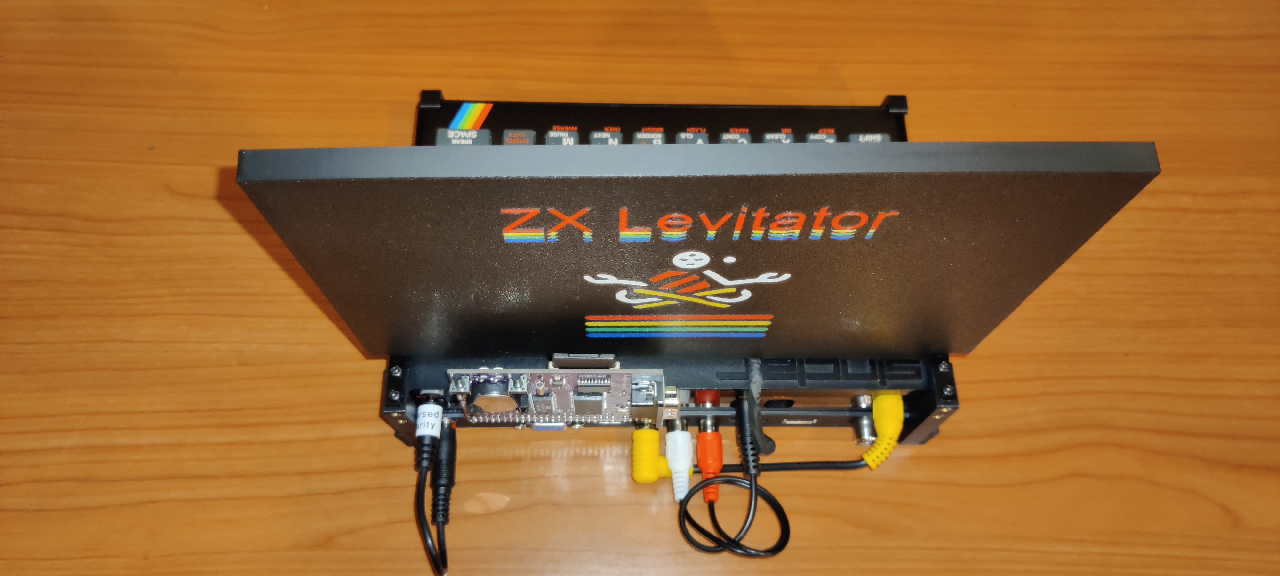
🔄 Fissaggio alternativo del monitor per espansioni verticali
Lo ZX Levitator consente di montare il monitor in due modi differenti: nella configurazione standard, con il monitor fissato dietro le staffe, oppure nella configurazione alternativa, con il monitor fissato sopra di esse.
Questa seconda modalità è utile quando si utilizzano espansioni dello ZX Spectrum con sviluppo verticale, che altrimenti andrebbero a collidere con il retro del monitor. Fissando il monitor sopra le staffe, il display risulta spostato di alcuni centimetri in avanti, lasciando così spazio sufficiente per installare senza problemi anche le schede più alte.
Procedura di fissaggio alternativo:
- Svitare le cerniere del monitor dalle staffe.
- Svitare le cerniere anche dal monitor stesso.
- Rimontare le cerniere sul monitor invertendole tra loro (la destra a sinistra e viceversa).
- Fissare quindi le cerniere nella parte superiore delle staffe.
Di seguito sono mostrate le due configurazioni possibili del monitor:
💡 Problemi comuni e soluzioni rapide
- Se non compare video: verificare che il Levitator e il computer siano accesi e che l'ingresso video corretto sia selezionato.
- Se non c'è audio: controllare i cavi RCA o il volume del Levitator.
- Se il computer non si accende: verificare la connessione 9V e la polarità (per i modelli con polarità invertita usare il cavo fornito).
- Se il display resta nero dopo lo standby: provare a spegnere e riaccendere il display con il pulsante frontale.
⚠️ Avvertenze importanti sulla sicurezza

Batterie al Litio - Precauzioni d'uso
Lo ZX Levitator contiene batterie agli ioni di litio. Per garantire un uso sicuro e prolungare la vita del dispositivo, seguire attentamente queste precauzioni:
- NON esporre a fonti di calore: Non lasciare il dispositivo vicino a radiatori, stufe, in auto sotto il sole o in ambienti con temperatura superiore a 40°C
- NON esporre alla luce solare diretta per periodi prolungati
- Evitare deformazioni della plastica: Il calore può deformare permanentemente le parti in plastica del case
- NON forare, schiacciare o danneggiare le batterie
- NON immergere in acqua o esporre a liquidi
- Utilizzare SOLO il caricabatterie fornito o specificato dal produttore (13V DC 3A)
- NON caricare incustodito per periodi prolungati
- Conservare in luogo fresco e asciutto (temperatura: 0-25°C)
- Tenere lontano da materiali infiammabili
- In caso di rigonfiamento, perdite o odori anomali: spegnere immediatamente e scollegare l'alimentazione
Smaltimento
Le batterie agli ioni di litio devono essere smaltite secondo le normative locali vigenti. NON gettare nei rifiuti domestici. Portare presso un centro di raccolta autorizzato per rifiuti elettronici (RAEE).
Trasporto
Quando si trasporta lo ZX Levitator (soprattutto in aereo), informarsi sulle normative vigenti per il trasporto di batterie al litio. Classificazione UN 3481.
📧 Contatti e ulteriori informazioni
Per ulteriori dettagli e aggiornamenti visita la pagina del progetto o scrivi a: zx.levitator@gmail.com